
The Sample Start Methodology
In the editing process, all samples in our libraries, including legato transitions and releases, are meticulously edited to ensure that the patches will play realistically and consistently in time.
We could edit samples by using essentially a gate, simply cutting each sample at the start of its waveform. However, editing samples in this way results in a patch that has timing inconsistencies:
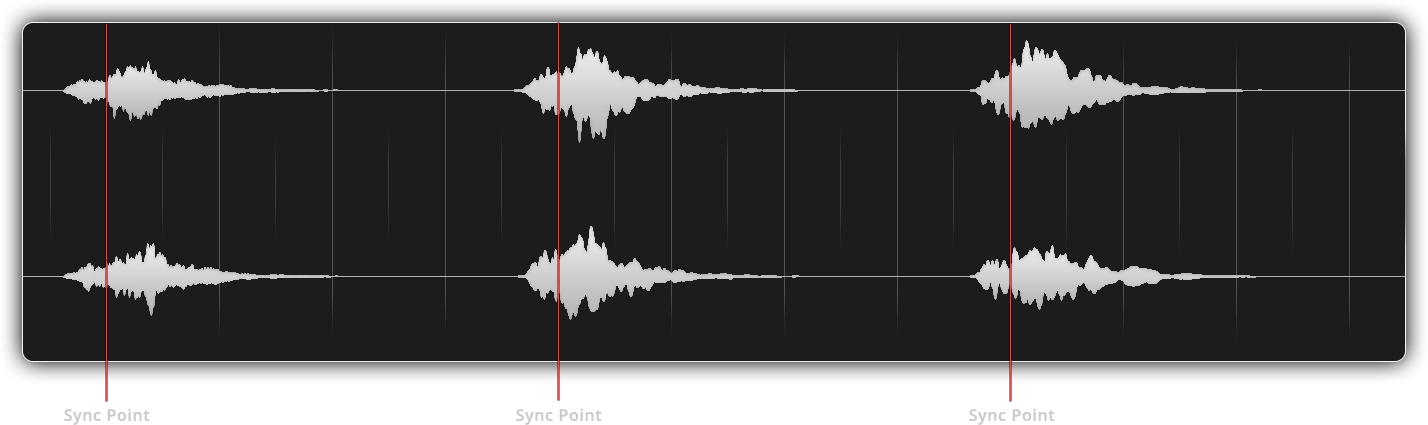
Instead, we cut every sample a fixed amount of time before the sync point. This audio between the start of the sample and the sync point is referred to as “padding” or “pre-padding”. In our libraries we use a padding amount of 250ms.
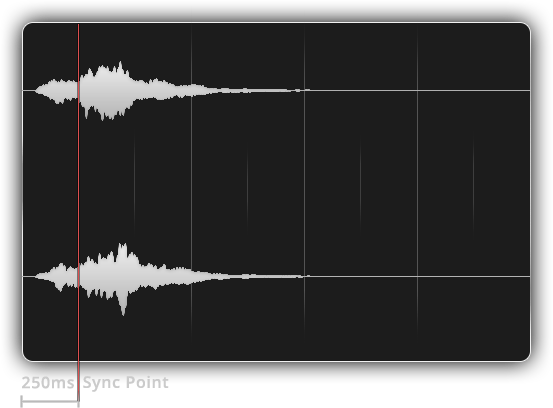
When used in a patch, samples with generous pre-padding will sound the most natural, but will introduce noticeable latency equivalent to the amount of pre-padding.
While this latency is normal and, in fact, intentional, playing a patch with 250ms of latency can be rather difficult. This is where the Sample Start controller comes in.
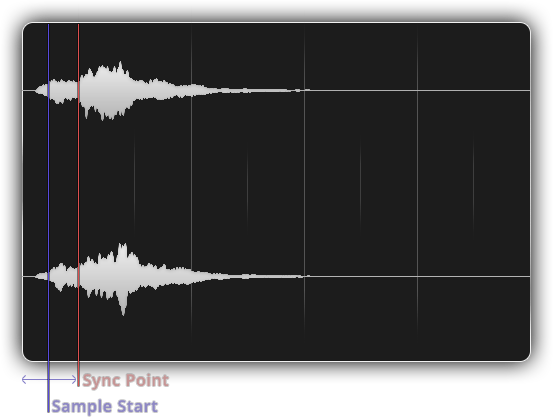
The controller allows you to choose where samples will start playing back from. The controller goes from 250 ms before the Sync Point (-250 ms), right up to the Sync Point itself (0 ms).
By setting Sample Start, you can adjust how “tight” or “loose” a patch will be.
A Sample Start value closer to 0 results in a “tighter” patch, meaning it has lower latency, but lacks realism: attacks, legato transitions, and releases sound very abrupt and unnatural.
A Sample Start value closer to -250 results in a “looser” patch, meaning it has higher latency, but is more realistic: attacks, legato transitions, and releases all remain intact.
So, how do we recommend using the sample start controller? Here is a proposed workflow:
- When recording MIDI, set Sample Start to 0 ms, this will cause the patch to sound a little unnatural and abrupt, but will virtually eliminate latency.
- Once you’re done recording and ready for playback, set Sample Start to a larger value. We recommend a setting of -125 ms. This will introduce a latency of 125ms, which should then be compensated for.
- For latency compensation, try either shifting your MIDI items earlier in time by 125 ms, or if your DAW supports it, applying a -125ms MIDI offset. This will keep your original recordings in time, but attacks, legato transitions and releases will be much more realistic.
-125 ms is just a recommendation, and we encourage you to experiment and adjust this setting to your liking. Just make sure that whatever value is displayed in the sample start controller is the value you are using for latency compensation.
We have set Sample Start to -125 ms as default for all patches, as we find this setting to be the best compromise between playability and realism.
If you just want fast, immediate response from the library, we provide Tight patches where Sample Start is set to 0 ms by default. Still, we highly encourage you to try the workflow proposed above, as it allows you to best use the library to its full potential.
For those who prefer to watch a video on The Sample Start Methodology, please view our tutorial below explaining sample start and how to best use it with our libraries.
